THE INFORMATION IN THIS ARTICLE APPLIES TO:
NOTE: This article provides guidelines for using a third-party tool with EFT. This article is not meant as formal support for that tool, but only as an example of setup options. Contact the third-party seller's support for detailed information about their product. Globalscape is not responsible for any configuration errors involving the third-party tool.
Overview
This document describes the steps involved in creating an ADFS IDP server and configuring it for testing. ADFS is a service that can be installed on a Windows Server system via Server Manager.
See https://msdn.microsoft.com/en-us/library/azure/dn528857.aspx
ADFS Prerequisites
- Windows 2022 Server with AD and Certificate Services installed.
ADFS installation
ADFS Configuration
Define your Federation Service Properties
- In the example image the AD Server's system name is ad and resides on the domain TEST

Define a Relaying Party Trust
- A relay party trust is basically where you tell the ADFS IDP server about your EFT.
- Select the option "Add relying party trust" to launch the configuration wizard.

Select the following options
- In the wizard, select the "Enter data about the relying party manually" option.
- On the Choose Profile add the AD FS Profile option (SAML 2.0 protocol).
- On the Configure certificate page, get your SSL Certificate specified your EFT Server's HTTPS SSL settings (you can grab the CRT file from programdata\globalscape\...and copy to your ADFS Sever. You will have to view all files when browsing to locate the certificate. Ignore the warning if you created your SSL Cert with less than 2048 bits.
- On the Configure URL page select the Enable support for the SAML 2.0 WebSSO protocol option.

- Note below we specified port 443, the PORT that the EFT Server's HTTPS protocol is listening on (your port may differ if using non-standard port for HTTPs in EFT).
- On the Configure Identifiers page enter your EFT Server's Entity ID. This is the Server Provider Entity ID field from your EFT Server's WEB SSO SAML configuration.

- On the Configure Multi-factor authentication now? option accept the default "I do not want..." option.
- On the Choose Issuance Authorization Rules option accept the default "permit.." option.
- Finish the Wizard, You have now defined EFT as an authorized Service Provider to the ADFS IDP backend.
Define Claim Rules
- Now that we've told our IDP server about our EFT Server (our SP) we need to tell our IDP what values we should expect from EFT to use to validate against our LDAP IDP server. Claim rules define these incoming parameters.
- Claim rules can also be used to transform your incoming authentication criteria into a format recognized by your backed authorization service. For example, EFT may send a request to authenticate user Parker@qatappin.local to our IDP server but our LDAP server will only authenticate based on just the user name "Parker" so we would create a claim rule to expect from our SP (EFT) a nameID in an email format and to transform it to just the username, we would then send the transformed username to our LDAP (or whatever backend you are authenticating against) and validate the user.
- Open up the Claim Rules editor for the EFT Relay Party you previously defined.

- Press the Edit Claims Rule link to launch the create Claim Rule Wizard. Add a an LDAP as Attributes Claim rule as shown below.
- We will configure our EFT SSO settings to use a NameID of type Email Address, here we are telling our ADFS IDP server to expect an email address and to use it to query the LDAP server to validate the user.

- Next we are going to add another Claim rule, this time select the Claim Rule Template Transform an Incoming Claim. This will transfer our Email Address claim to associate Email with our NameID.

- The Claim Rule order is important, make sure that rule 1 is the LDAP attributes as Claims exists prior to the Persistent ID Claim rule.

Define Authentication Policies
- This is where we define how we are going to permit users to log into the IDP Server from the WTC SSO login button. Here we are going to permit login from a regular WEB Page rather than from, for example a windows authentication popup box.

Set Relying Party Trusts Signature
You must provide the EFT site certificate to sign the message sent to ADFS. This can be done by selecting the Relying Party Trusts, click on Properties and click on the Signature tab (failure to do so will result in failure to login to EFT's WTC page)

Click on Add and select the CRT certificate for your EFT site.
Test Authentication
With Forms authentication enabled when users log into WTC and press the SSO Login button they will be directed to the ADFS Server's Forms based login page, as shown below.

To test authentication, you will need to select the radio button for your recently created ADFS Relying Party Trusts configuration.
Configuring EFT's WEB SSO
Create your EFT Site
- Create a GS Auth Site with HTTPS enabled, here we are using port 443
- Create a user whose login name is an email address that exists on your AD Server.

Configure EFT's SSO Settings

Configuration Values
- Entity ID: Your EFT Server's URL make sure that whatever you use resolves to a valid IP address (modify your hosts file if needed and add your EFT system to the same domain as your ADFS Server).
- Reserved Path: Set by Default by EFT.
- Identity Provider: Your IDP's identifier (as depicted below):

- POST URL: On your ADFS Server go to Endpoints and locate the endpoint URL path for the SAML 2.0 specification

- Public Key: On your ADFS Server export the server's Token-signing certificate and copy it to your EFT Server. Reference it in your Public Key SSO configuration field.

- User Name: The User Name field is the value you send to your IDP server to validate that the user is authentic. In this example we are going to configure our ADFS Server to expect the User Name ID field to come in in the format of an Email Address.
Log in to WTC Via SSO
- now launch WTC And and press the SSO Button. You should be redirected to the ADFS IDP page.
- Log in, you should be redirected to the user's WTC homepage.
Troubleshooting TIPS
- For this example test that uses EFT's SSO Configuration defined to use Email Addresses your AD Users need to have Email addresses defined for them.
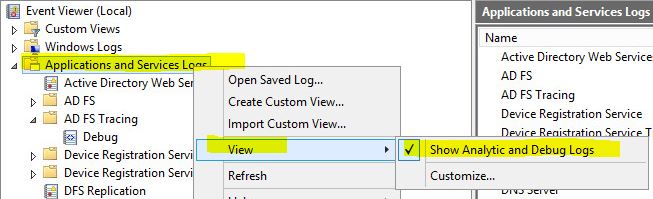
Turn on ADFS logging

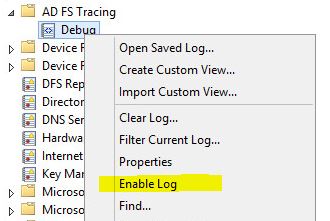
- Open Up Event Viewer and enable analytic and debug logs. Refresh your view; a new AD FS Tracing folder will appear.
- Right click on Debug and select Enable Log
Additional Notes:
If you want to configure your authentication to use SAMAccountName rather than the user's email address you will need to configure your ADFS server to use SAM-Account-Name
