THE INFORMATION IN THIS ARTICLE APPLIES TO:
- CuteFTP Pro® version 8.x on Windows Server 2003
DISCUSSION
This article guides you through the steps of setting up CuteFTP Pro on a Windows 2003 Server computer such that CuteFTP Pro runs as a service. Doing so will enable scheduled jobs (such as folder synchronization) to be completed even without a user logging into that computer.
The configuration requires the use of utilities available in Microsoft Windows Server 2003 Resource Kit Tools.
This article assumes CuteFTP Pro version 8 is already installed and activated.
This article is provided as a convenience to our customers. Although the steps shown have been tested, configuration in this manner is not officially supported by the GlobalSCAPE Technical Support team.
INSTALLING MICROSOFT WINDOWS SERVER 2003 RESOURCE KIT TOOLS
- Browse to the Microsoft Windows Server 2003 Resource Kit Tools download page and follow the onscreen instructions to download rktools.exe.
- To install the Resource Kit tools, run rktools.exe. By default, the resource kit files are extracted to %Program Files%\Windows Resource Kits\Tools\.
- For these purposes, there are only two components of the Resource Kit that are needed. They are the Service Installer (instsrv.exe) and the Applications as Services Utility (srvany.exe). After the installation is finished, open %Program Files%\Windows Resource Kits\Tools\ and confirm those files exist.
CONFIGURING CUTEFTP PRO AS A SERVICE
CuteFTP Pro consists of two components; the Transfer Engine or TE (ftpte.exe) and the CuteFTP user interface or GUI (cuteftppro.exe). To be successful, both components must be configured to run as services with the TE service loading first.
Caution: The following steps involve editing the Windows registry on the server computer. Incorrectly editing the registry may severely damage your system. These instructions are intended for the advanced user who is prepared to both edit and restore the registry. We recommend that you backup the registry before proceeding.
- Open a command prompt. (On the Start menu click Run, type cmd.exe and then click OK.)
- To create the service for the TE, type the following at the command prompt: [reskitpath]\instsrv.exe “GlobalSCAPE CuteFTP PRO TE” [reskitpath]\srvany.exe (Where [reskitpath] is the path to the Windows Resource Kit folder. By default the path to the Resource Kit folder is C:\Program Files\Windows Resource Kits\Tools\.)
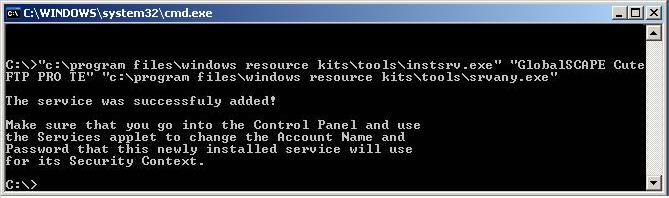
- To create the service for the GUI, type the following at the command prompt: [reskitpath]\instsrv.exe “GlobalSCAPE CuteFTP APP” [reskitpath]\srvany.exe
- Start Registry Editor (On the Start menu click Run, type regedit and then click OK.) and navigate to the following subkey:
HKEY_LOCAL_MACHINE\SYSTEM\CurrentControlSet\Services\GlobalSCAPE CuteFTP PRO TE\
- Verify that the value for the entry named ImagePath is set to point to srvany.exe (If this is not set correctly, the service will stop shortly after it starts and return an Event ID 7000 "The service name failed to start.")
- Select the GlobalSCAPE CuteFTP PRO TE subkey and then on the Edit menu click New then click Key.
- Create a new subkey named Parameters. If you are prompted for a class, leave it blank.
- Select the newly created Parameters subkey and then on the Edit menu click New and then click String Value.
- For the entry name, type Application. For the data type, select REG_SZ.
- For the string value, type the full path to the CuteFTP Pro TE (ftpte.exe). By default the full path is C:\Program Files\GlobalSCAPE\CuteFTP 8 Professional\ftpte.exe.

- Navigate to the following subkey:
HKEY_LOCAL_MACHINE\SYSTEM\CurrentControlSet\Services\GlobalSCAPE CuteFTP APP\
- Verify that the value for the entry named ImagePath is set to point to srvany.exe (If this is not set correctly, the service will stop shortly after it starts and return an Event ID 7000 "The service name failed to start.")
- Select the GlobalSCAPE CuteFTP APP subkey and then on the Edit menu click New then click Key.
- Create a new subkey named Parameters. If you are prompted for a class, leave it blank.
- Select the newly created Parameters subkey and then on the Edit menu click New and then click String Value.
- For the entry name, type Application. For the data type, select REG_SZ.
- For the string value, type the full path to the CuteFTP Pro GUI (cuteftppro.exe). By default the full path is C:\Program Files\GlobalSCAPE\CuteFTP 8 Professional\cuteftppro.exe
- Navigate to the following subkey:
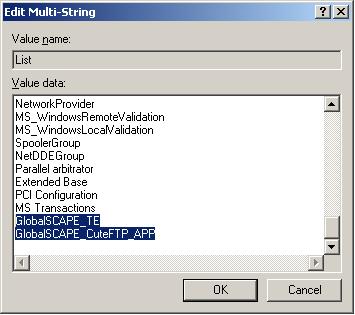
HKEY_LOCAL_MACHINE\SYSTEM\CurrentControlSet\Control\ServiceGroupOrder
- Double-click on the list entry and add a new value in the list named GlobalSCAPE_TE. Immediately below that, create a second new value named GlobalSCAPE_CuteFTP_APP. It is important that GlobalSCAPE_CuteFTP_APP is listed after GlobalSCAPE_TE in the list. Place the new values into the list at the point in the startup sequence where you want the CuteFTP services to start. (For example, to configure it so that the CuteFTP services start after all other services, place the two new values at the end of the list.)
- Click OK to close the editing screen.
- Navigate to the following subkey:
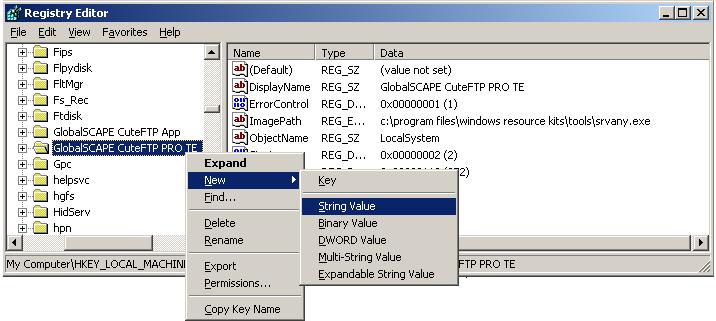
HKEY_LOCAL_MACHINE\SYSTEM\CurrentControlSet\Services\GlobalSCAPE CuteFTP PRO TE
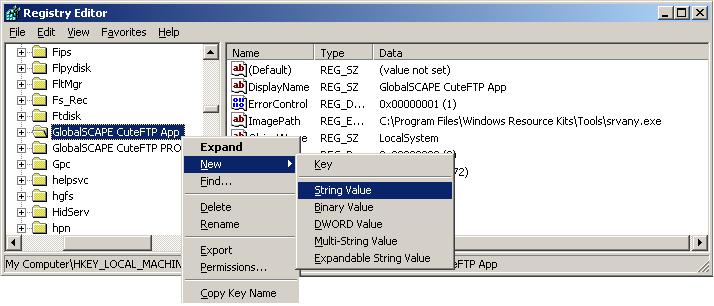
- Right-click on the name of the subkey, click New and then click String Value.
- For the name, type Group. Double-click to modify the newly created Group entry and type GlobalSCAPE_TE for the value associated with the transfer engine.
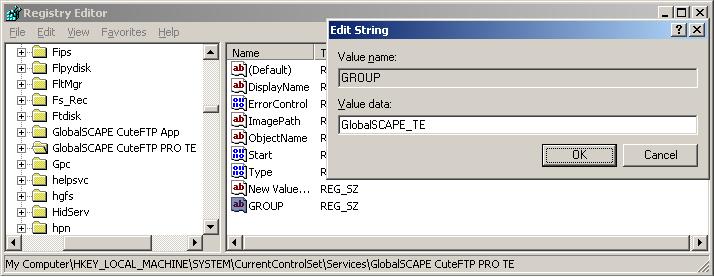
- Click OK to close the editing screen.
- Navigate to the following subkey:
HKEY_LOCAL_MACHINE\SYSTEM\CurrentControlSet\Services\GlobalSCAPE CuteFTP APP
- Right-click on the name of the subkey, click New and then click String Value.
- For the name, type Group. Double-click to modify the newly created Group entry and type GlobalSCAPE_CuteFTP_APP for the value associated with the CuteFTP GUI.
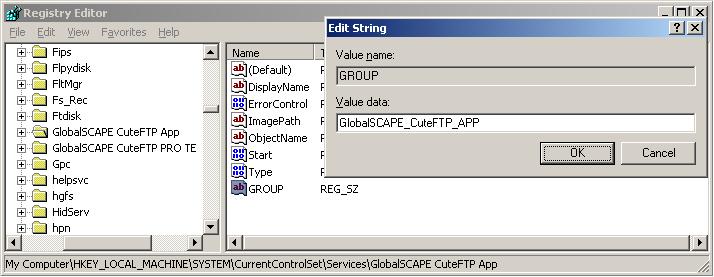
- Click OK to close the editing screen.
- Close Registry Editor.
- In Control Panel, double-click Administrative Tools and then double-click Services.
- Follow the steps shown for both the GlobalSCAPE CuteFTP Pro TE service and the GlobalSCAPE CuteFTP APP service.
- Double-click the service named GlobalSCAPE CuteFTP Pro TE to access the service properties.
- On the Log On tab, select the Allow Service to Interact with Desktop check box and then click OK.
- Repeat the two steps above for the service named GlobalSCAPE CuteFTP APP.
- Restart the computer.
- By default, the newly created services are configured to run automatically when the system is started; To start the CuteFTP Pro services manually, click Start Service for both GlobalSCAPE CuteFTP Pro TE service and the GlobalSCAPE CuteFTP APP service.
Additional Considerations
- It is important to note that CuteFTP Pro makes use of the user profile area to store important information such as trusted SSL certificates and SSH server keys, as well as site manager data, log files, and so on. The user profile area is typically a per-user path on the computer such as C:\Documents and Settings\<username>. Data is stored in the following subfolder of the user profile: Application Data\GlobalSCAPE\CuteFTP Pro\8.0
Because CuteFTP Pro is now running as a service, it will use the user profile area with the username LocalService. You can change the user account under which the CuteFTP Pro services run in the Services Administration Utility; however, be sure that you also:
- Update the Access Control Lists (ACL) on the required files for the CuteFTP Pro services (read permissions on the installation folder).
- Migrate any required files from the prior user profile, for example if you have already trusted a server SSH key then be sure to copy the Security folder to the new profile.
- After starting the CuteFTP Pro services, perform the following operations:
- Connect to any security-enabled site (FTP over SSH, or FTP over SSL) and ACCEPT the SSH Key or SSL Certificate. You need to do this once for each security-enabled site to which you connect so that the subsequent connections do not block on waiting for the acceptance of the certificate or key.
- For each of your selected sites, ensure that uploads and downloads both work as expected. Performing a simple transfer test interactively will help to avoid hidden or complex errors that might occur in unattended mode.
- In the CuteFTP Pro GUI, on the Tools menu click Global Options. Expand Transfer and click Smart Overwrite. Configure the desired prompt timeout action and delay time so that in the event of an overwrite prompt during unattended operation, your desired action is carried out automatically.
- Finally, set up your Folder Monitor (or similar) rule for the unattended job(s). Connect to the remote server and then on the Tools menu click Folder Tools and then either Monitor Local Folders (if you wish to periodically upload local files to the remote side), or Synchronize Folders (if you wish to both upload and download).
- If you restart the computer running this new service such that a specified scheduled task interval is missed (for example, the computer goes down on a Friday and is not restarted until Monday, therefore missing two nightly jobs), the service will likely show the following screen. Note that the default action of Execute all is sufficient and the timeout (shown as a number in parentheses counting down to 0) will take place so that the net result is resuming the proper operation of the service. This is not an error; it is documented here to avoid confusion over this issue.
Note: If you receive "Error code 80080005 -- server execution failed." see the Microsoft knowledge base article #870655 at http://support.microsoft.com/kb/870655.