THE INFORMATION IN THIS ARTICLE APPLIES TO:
- EFT version 7.0 and later
DISCUSSION
You can use Advanced Workflows to design scripts, batch files, macros, or any other code-intensive process using an easy drag-and-drop interface. AW actions allow you to create custom, complex interactions within EFT and use them in Event Rules.
One such action is the Execute DLL Function action. The Execute DLL Function action executes a specified method in a dynamic-link library (DLL) and stores the return value of the method in an AWE variable. The Execute DLL Function action only accepts simple data types as parameters. The purpose of this article is to show a sample C# class that allows the return of complex data types. Accompanying this article is a .NET C# example meant as a guide and template to create your own DLL. The DLL source provided demonstrates (as may be required) a simple example of a call to the SFTPCOM EFT Library which, given a Site name and a User name, returns a complex type (class) with the user name, home directory of that user, and an internal message. It is left as an exercise to extend and/or change this code to taste. The DLL Action is very versatile if you have your own managed or unmanaged DLL whose function signature is known.
(After the procedure is example code and a ZIP with example files that you can download.)
To use the Execute DLL Function action
- In the EFT administration interface, connect to EFT, and then click the Server tab.
- In the left pane, click the Advanced Workflow node. The Advanced Workflow pane appears.
- In the right pane, click New. The Create a Workflow dialog box appears.
- In the What do you want to call this workflow box, specify a name for the workflow. When you add the workflow to Event Rules, the name you specify here appears in the Rule.
- (Optional) Provide a description of the workflow, then click OK. The AWE interface appears.
- First, you need to create a variable that will be populated with the return value. Expand the Variables node, then drag the Create Variable action to the Steps pane (or you can double-click it). The Create Variable dialog box appears.
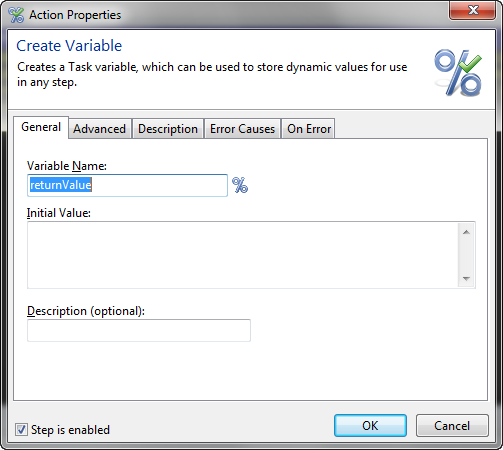
- In the Variable name box, specify the Variable Name and its Initial Value, then click OK. You can create your own variable or use the Expression Builder to specify an EFT variable by clicking the percent sign %.
- Expand the Advanced node and drag the Execute DLL Function action to the Steps pane. The Execute DLL Function dialog box appears.
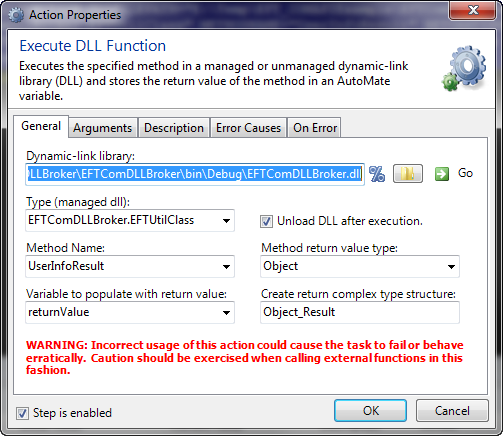
- In the Dynamic-link library box, click the folder icon to specify the DLL file to use.
- Clicking Go causes AWE to attempt to query available DLL types in the DLL you specified. (If it is currently being used by another process, AWE will not be able to query the DLL.) Upon a successful query, all discovered types will be populated into the Type, Method Name, and Method return value type fields, if applicable. Click the down arrow next to the Type, Method Name, and Method return value type box to display a list of values from which to select. If your DLL is a managed DLL, the Type box will allow you to specify the class that contains the available methods.
- In the Method Name box, specify the DLL function you want to call. If you select a class under the Type parameter, all discovered methods relating to that class will be populated into this field.
- In the Method return value type box, select the type of data your function will return. Options include: Boolean, Byte, Char, Decimal, Double, Int16, Int32, Int64, SByte, Single, String, UInt16, UInt32, UTint64, Object, and Void.
- In the Variable to populate with return value box, select the variable that will receive the return value of the function being called.
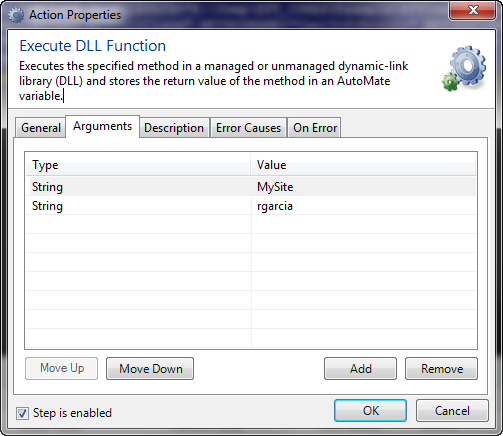
- Click the Arguments tab and specify the data that will be passed to the function being called. Variables are allowed.
- Click OK to save the action. (Note: On the On Error tab, you can specify what to do in case the action encounters an error, such as stop, retry 3 times, send e-mail, etc.)
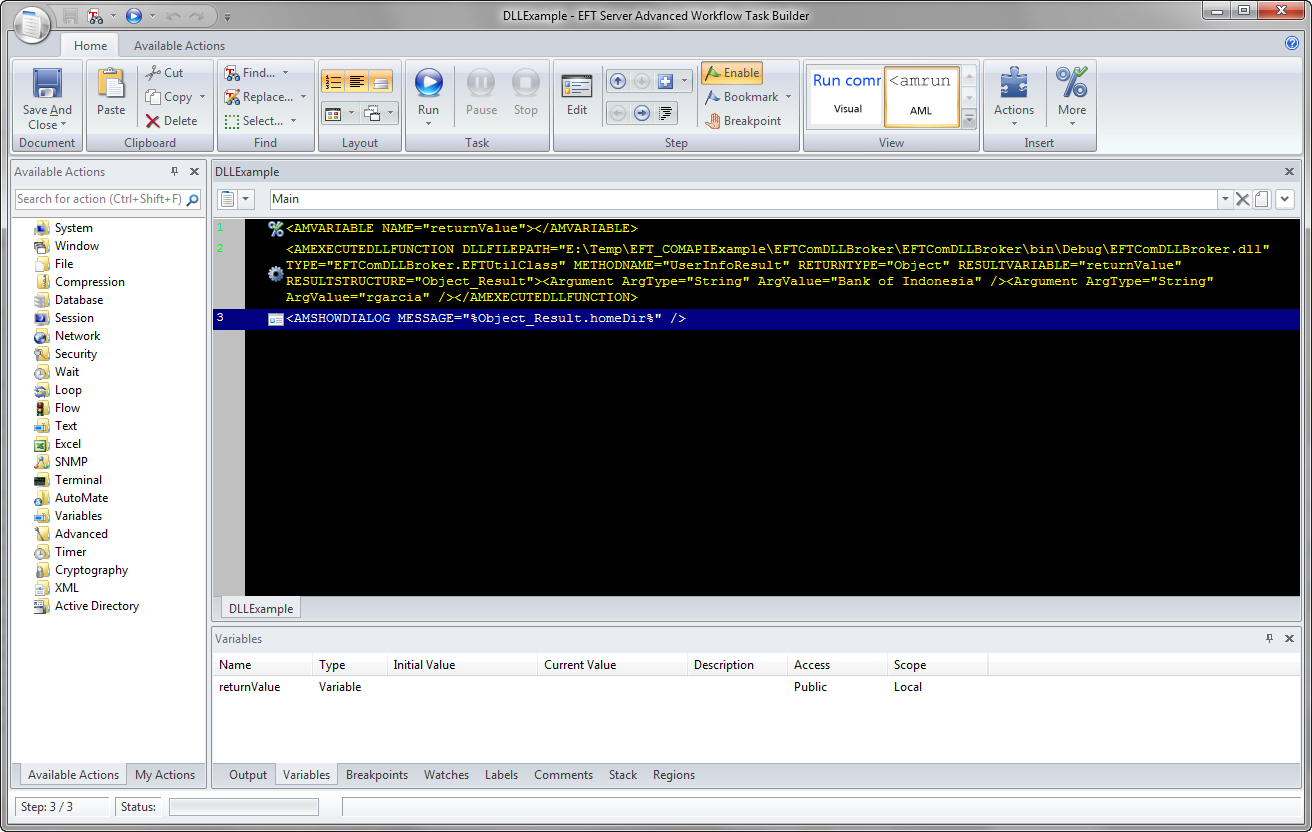
- Click Run to test your workflow.
- Your workflow can now be added to an Event Rule.
.NET C# Code Example
using System;
using System.Collections.Generic;
using System.Linq;
using System.Text;
using SFTPCOMINTERFACELib;
namespace EFTComDLLBroker
{
public class UserInfoResult
{
public string user { get; set; }
public string homeDir { get; set; }
public string message { get; set; }
}
public class EFTUtilClass
{
public static UserInfoResult UserInfoResult(string targetSite, string targetUser)
{
UserInfoResult result = new UserInfoResult();
CIServer m_server = new CIServer();
String serverNameOrAddress = "localhost";
int remoteAdminPort = 1100;
string mySiteName = "";
try
{
//User for Windows Authentication
m_server.ConnectEx(serverNameOrAddress, remoteAdminPort, AdminLoginType.IWALogin, "", "");
//Use for Globalscape Administrative Authentication
//String username = "admin";
//String password = "password";
//m_server.Connect(serverNameOrAddress, remoteAdminPort, username, password);
}
catch (Exception e)
{
result.message = e.Message;
return result;
}
try
{
CISites sites = m_server.Sites();
if (sites.Count() > 0)
{
string siteName = targetSite;
CISite selectedSite = null;
for (int i = 0; i < sites.Count(); i++)
{
CISite site = sites.Item(i);
if (site.Name == siteName)
{
selectedSite = site;
mySiteName = site.Name;
break;
}
}
if (selectedSite != null)
{
try
{
CIClientSettings userSettings = selectedSite.GetUserSettings(targetUser);
if (userSettings != null)
{
string homeFolder = userSettings.GetHomeDirString();
result.user = targetUser;
result.message = "Success";
result.homeDir = homeFolder;
}
else
{
result.message = "User not Found!";
}
}
catch (Exception ex)
{
Console.WriteLine(string.Format("Could not configure user. Error: {0}", ex.Message));
result.message = ex.Message;
}
}
else
{
result.message = "Site not Found!";
}
}
}
catch (Exception e)
{
result.message = e.Message;
}
return result;
}
}
}
In the help for your version of EFT, refer to the following topics for more information:
- Creating Workflows for Use in Event Rules
- Create Variable Action
- Execute DLL Function Action