THE INFORMATION IN THIS ARTICLE APPLIES TO:
- EFT Server, versions 6.1.x and earlier only
- For version 6.2 and later, refer to the help in EFT.
SYMPTOM
Can I change the logo or colors in the WTC?
RESOLUTION
If you are comfortable editing CSS and HTML pages, the Web Transfer Client (WTC) can be easily customized to suit your needs. For example, you can edit the colors and fonts in the style sheet, and you can replace the EFT logo (header.gif) with your own company's logo of the same size. The appearance of the Web Transfer Client is controlled by the style sheets. The image files can be substituted with your custom images. If you lack the resources to edit CSS and HTML pages yourself, or if you want to make functional changes to the WTC, the Globalscape Professional Services group can create rebrand the WTC login page for you.
Before you make any changes, make a backup copy of the style sheet. (For detailed instructions for editing CSS files, refer to http://www.w3.org/MarkUp/Guide/Style.)
The Web Transfer Client Web page is hard coded in the EFT code; however, you can add a registry key that will use an edited version of the Web Transfer Client Web page called EFTWebClient.htm. EFTWebClient.htm is not used by default; you have to create a registry key to "tell" EFT Server to use that file. (Otherwise, the hard-coded version is used.)
The EFT Server code that creates EFTWebClient.htm differs between versions; therefore, if you copy EFTWebClient.htm from one version to the next, you might not get the same results. Be sure to keep track of the changes you have made to the files (i.e., comment your code) and merge your changes into the next version when you upgrade. Tools such as Beyond Compare (by Scooter Software) or WinMerge (Open Source) can come in handy for porting custom changes over to new versions.
- In EFT Server 5 and prior, the default location of the Web Transfer Client files is C:\Program Files\GlobalSCAPE\EFT\EFTClient.
- In EFT Server v6, the default location of the Web Transfer Client files is C:\Program Files\GlobalSCAPE\EFT Server\Client or C:\Program Files\GlobalSCAPE\EFT Server Enterprise\Client
- In v6.1 - 8.0.4, the default path of the Web Transfer Client files is C:\Program Files\GlobalSCAPE\EFT Server\web\contrib\EFTClient or C:\Program Files\GlobalSCAPE\EFT Server Enterprise\web\contrib\EFTClient. Edited pages should be saved in the \custom\ folder, keeping the original files unchanged.
You do not need to create a copy of EFTWebClient.htm or obtain it from any other source if you are using v6.1 or later.
In v6.0.x and earlier, do the following to create a copy of EFTWebClient.htm:
- Create a test account for the EFT Server.
- Open up a web browser and log into the EFT Server using the test account.
- Save the web page as an .htm file.
- For IE, click File > Save As.
- Click Save as type > Webpage, HTML only, and save the file as EFTWebClient.htm.
To use EFTWebClient.htm (for v6-6.1.x)
- Make your changes to EFTWebClient.htm, save a copy, then paste it into the EFT Server installation folder's Client or EFTClient subfolder, depending on your version.
-
Create the registry entry for the customized WTC page, "http-applet:/EFTClient/EFTWebClient.htm" and set the value to the physical path to the new file. You can add the key to a .reg file in the following format:
|
Windows Registry Editor Version 5.00
[HKEY_LOCAL_MACHINE\SOFTWARE\GlobalSCAPE Inc.\EFT Server 4.0\EFTClient]
"use_registry"=dword:00000001
"http-applet:/EFTClient/EFTWebClient.htm"="C:\\Program Files\\GlobalSCAPE\\EFT\\EFTClient\\EFTWebClient.htm"
|
--Be sure to provide the correct path to the EFTWebClient.htm file.--
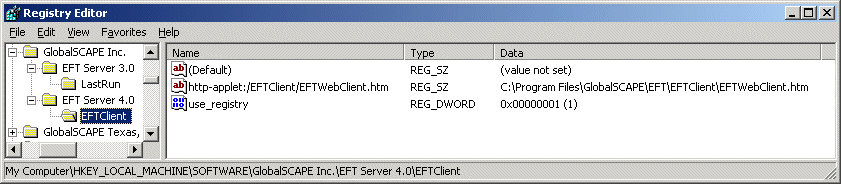
(Note that your path may be different, depending on where you installed EFT Server.)
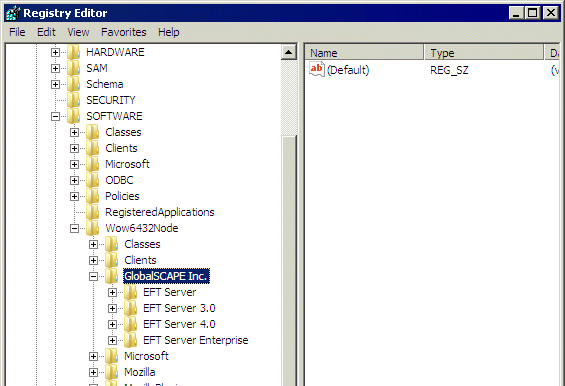
****On a 64-bit OS, the path is:
[HKEY_LOCAL_MACHINE\SOFTWARE\Wow6432Node\GlobalSCAPE Inc.\EFT Server 4.0\EFTClient]
-
Stop and start the EFT Server service for your changes to take effect.
-
Open the WTC page in your browser to confirm that the changes you want are there.
EXAMPLE
To edit the logout text in EFTWebClient.htm
You can edit the text that appears after a user has logged out of the Web Transfer Client to add to or remove the existing text:
- In EFTWebClient.htm, find the following line that handles the "logout" button:
|
<td>
<img src="/EFTClient/btnLogout.gif" id="btnLogout" name="btnLogout" onclick="doLogout(); showLogoutPage();" value="Logout"/>
</td>
|
- "showLogoutPage()" is a javascript function that writes the logout page to the browser window. The function is found in EFTWebClientLogic.js, but you can make your own function inside EFTWebClient.htm to call instead of the default one. Update the code to point to a new function as shown below (change in red text):
| <td><img src="/EFTClient/btnLogout.gif" id="btnLogout" name="btnLogout" onclick="doLogout(); showLogoutPage_New();" value="Logout"/></td> |
Add a new function to the "javascript" portion at the top of the page (between the <head> tags), making a function that reads as follows (you can edit the displayed text as you please, shown in red text below):
|
<script language="javascript">
function showLogoutPage_New()
{document.write("<html xmlns=\"http://www.w3.org/1999/xhtml\">");
document.write("<head>");
document.write(" <title>WTC Logged out</title>");
document.write(" <meta http-equiv=\"Content-Type\" content=\"text/html; charset=UTF-8\">");
document.write(" <title>GlobalSCAPE® EFT Web Transfer Client</title>");
document.write(" <link href=\"/EFTClient/EFTStyles.css\" rel=\"stylesheet\" type=\"text/css\">");
document.write("</head>");
document.write("<body>");
document.write("<br/><br/><br/><br/>");
document.write("<hr color=\"#000000\" size=\"1\"></hr>");
document.write("<table align=\"center\" border=\"0\" style=\"position:relative;top: left: 0px;\" >");
document.write("<tr><br>");
document.write("<td valign =\"middle\">");
document.write("<strong>You are now logged out.</strong><br>");
document.write("Directory listings and other screens may be retained by<br>");
document.write("your browser's history. We recommend you delete<br>");
document.write("temporary files if extremely sensitive data is involved.<br><br>");
document.write("<strong>Security notice:</strong><br>");
document.write("When logging on to this server, we will never<br>");
document.write("ask for any personal information other than <br>");
document.write("your account login name and password.<br><br>");
document.write("If you are ever prompted for additional personal<br>");
document.write("information upon attempting to log in, please<br>");
document.write("contact the server administrator.<br>");
document.write("</td>");
document.write("</tr>");
document.write("</table>");
document.write("</body>");
document.write("</html>");
document.close();
}
</script>
|
- Save your changes and paste EFTWebClient.htm into the EFT Server installation folder's Client or EFTClient subfolder.
- Stop and start the EFT Server service for your changes to take effect.
- Open the WTC page in your browser to confirm that the changes you want are there.
- Logout to ensure the logout text that you want appears correctly.
(Refer to https://kb.globalscape.com/KnowledgebaseArticle10505.aspx for more WTC-specific keys.)